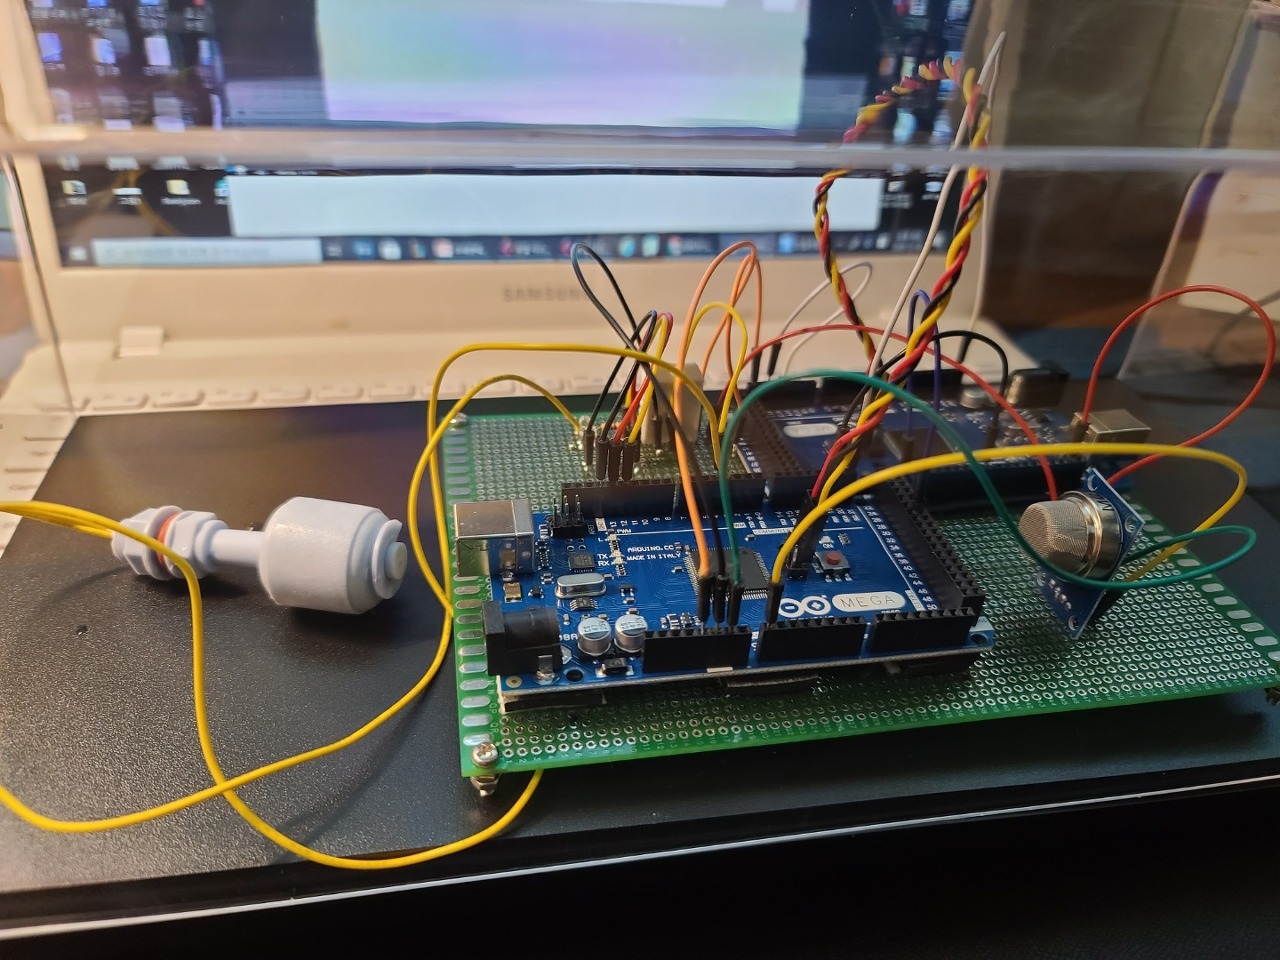
아두이노를 이용해서 실시간으로 온도, 습도, 액체의 높이, 가스를 측정해보려고 했다.
사용된 센서들은 온습도센서(MQ-2), 가스센서(DHT-22), 아두이노(Mega2560). 액체레벨센서(zp2508)
그리고 아두이노 메가2560 (Mega2560), 빨간색, 초록색LED 1개
점퍼와이어, PCB 기판, 납, 인두기 등을 이용하였다. (액체측정을 위한 컵 + 물)
테스트 시 외부전원을 이용할 것이라면 5V 충전기를 하나 준비해두면 좋다.
캡스톤 디자인을 하거나, 아두이노 프로젝트를 해야하는 사람에게 도움이 되길 바라면서 글을 남긴다.
How to detect tempertaure, humidity, gas and liquid level using Arduino?
It is a simple machine made of gas sensor(MQ-2) & temperature and humidity sensor(DHT-22),
liquid level sensor (zp2508) and some jumper wire, red led x 1, green led x1 arduino(Mega2560 or ADK),
USB-B type connector between aruino and PC.
[ You also need PCB and lead + lead iron + some glass of water ]
I hope this posting will help somebody who is doing Capstone design or Arduino project.
The following content is my code in arduino sketch.
#include <DHT.h>
#define TEMP 2// 2번에 연결
#define DHTTYPE DHT22 // dht22 센서 이용
DHT temp(TEMP, DHTTYPE); // 센서 초기화 (객체생성)

// 플로트 센서
int FireAlarm = 0; // 평상시는 0, 어플에서 누르면 1
int MOB = 0;
const int gasPin = A0 ; // 가스 관련 센서 A0
int FloatSensor = 3; // 플로트 센서는 3번
int gled = 12; //green led
int rled = 13; //red led
int buttonState = 1; //reads pushbutton status


void setup(){
  temp.begin();
  Serial.println("TEMP TEST!"); // 시리얼 모니터에 나옴
  Serial.begin(9600);
  pinMode(A0, INPUT);
  pinMode(FloatSensor, INPUT_PULLUP);// 플로트
  pinMode(rled, OUTPUT);// 플로트
  pinMode(gled, OUTPUT);//
}

void loop(){
  float a = temp.readTemperature();
  float b = temp.readHumidity();
  buttonState = digitalRead(FloatSensor); // buttonState는 액체레벨 플로팅 (Liquid level sensor)

    // 시리얼에 가스센서와 온도 센서 출력
    Serial.print("gas level:");
    Serial.print(analogRead(gasPin));
    Serial.print(" \t");
    Serial.print("temperature: ");
    Serial.print(a);
    Serial.print(" \t");
    Serial.print("Humidity: ");
    Serial.print(b);
    Serial.println(" %");

  //

  if (buttonState == HIGH) {
    digitalWrite(gled, LOW);
    digitalWrite(rled, HIGH);
    Serial.println("WATER LEVEL - LOW"); // 기준 수면보다 낮으면 초록불
  }
  else {
    digitalWrite(gled, HIGH);
    digitalWrite(rled, LOW);
    Serial.println("WATER LEVEL - HIGH"); // 기준 수면보다 높으면 빨간불
  }
  delay(3000);

 }

액체 레벨 센서가 작동되는 모습이다.
아무런 문제 없이 작동하는 것을 볼 수 있다.
조금 더 활용하려고 한다면 여러개의 센서가 필요할 것이다.
( 높이에 따른 데이터를 받아오는 경우를 말하는 것이다. )
You can see the red & green lamp operating with liquid level swtich.
Every function ok
If you check more level in detail, you have to more liquid level sensor and attach other height.

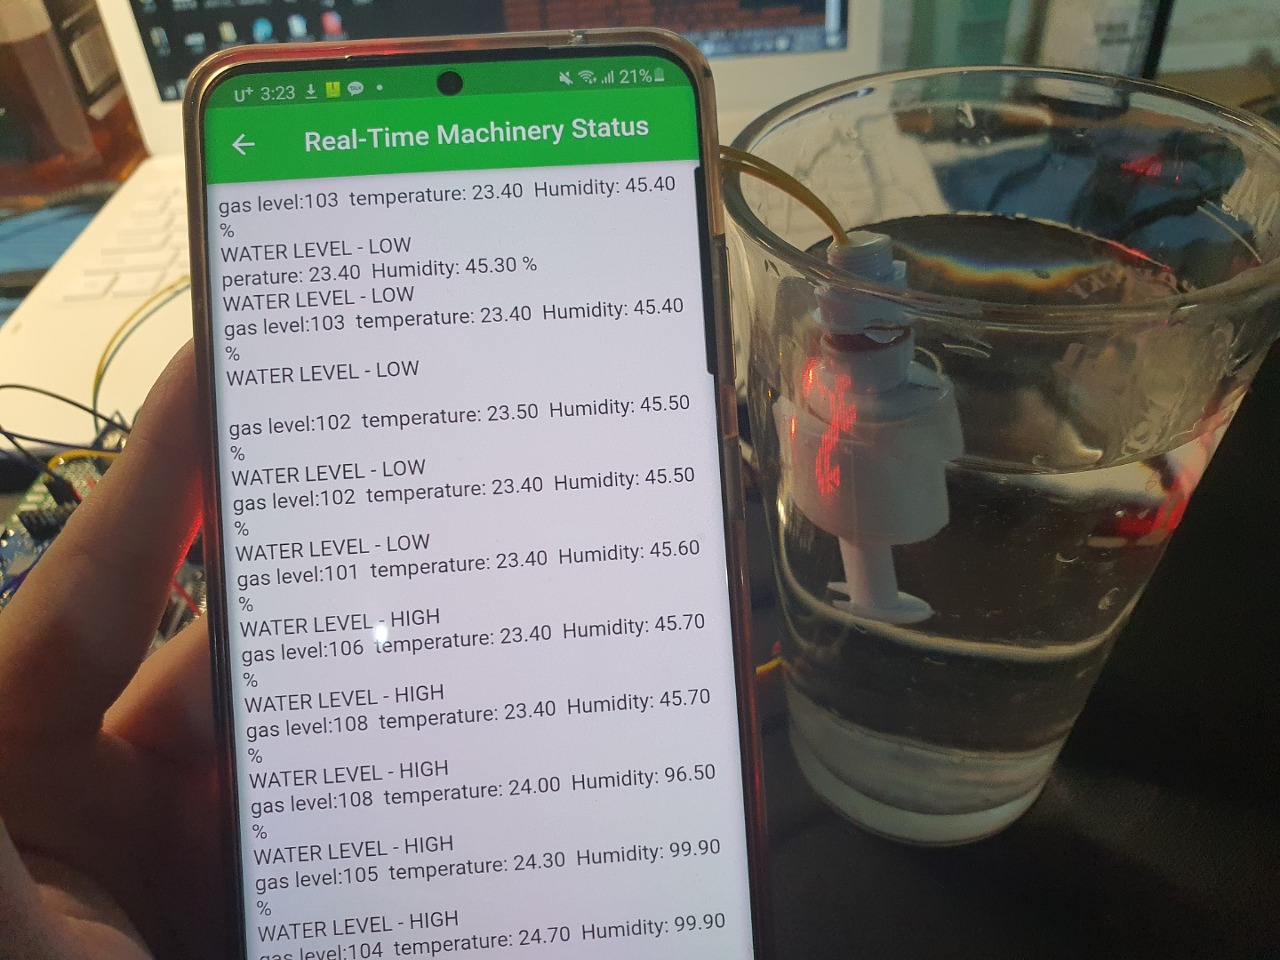
우리는 서버가 따로 없어서 블루투스를 이용해서 값을 전달받게 만들었다.
물론 어플리케이션 부분은 내가 건든게 아니라서, 텍스트를 단순히 붙여넣기만 했지만...
블루노(Bluno)를 이용하거나, 서버를 구축한다면 실시간으로 어플리케이션에 값을 입력받을 수 있을 것이다.
가스센서 값이 1023이 나오면 납땜을 잘못한 것이니까, 다시한번 확인하길 바란다.
MAX값이 1023인데 연결이 잘못되어서 저항이 무한대로 나온다는 뜻이니까.
방법은 따로 써서, 링크로 대체하겠다.
We did not have server for data, i use bluetooth(bluno) to send data from arduino to application.
The photo is not real function application, it is just paste txt file flutter by my teamate.
if you use bluno or wifi board (Uno Wifi Rev2 etc) or making server for database, you can read the realtime data from sensor (DHT-22, MQ-2, etc..) through arduino.
Tip: If displaying gas senor data is 1023, you have to check your lead on pcb or jumper wire becasue the maxium of data is 1023. In other words, the resistance value is infinity = data is 1023 = miss connection or miss lead.
Way to making realtime sensor data file is following link.
'아두이노(Arduino)' 카테고리의 다른 글
| 64x32 RGB led Matrix 연결 방법 및 예제 코드, led 매트릭스 쓰는 법 (0) | 2022.05.27 |
|---|---|
| #01) 아두이노 캡스톤 디자인, 원격 선박제어 (0) | 2022.05.27 |